Showing posts with label scenery. Show all posts

Thursday, 17 February 2022

Hazard lines!!!

I was totally inspired for Necromunda after playing a few games recently but not having much time I chose a quick scenery upgrade to improve my terrain.

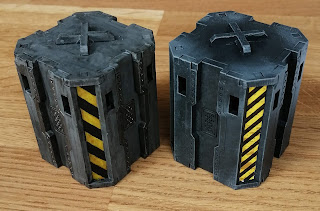
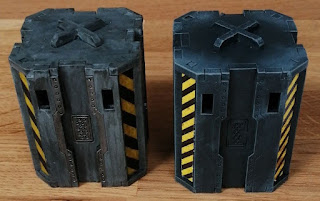
I noticed some printable weathered hazard stripes on instagram a while ago and have been using them on the columns from TT Combat. Originally I was a bit dubious of 'cheating' by using printed hazard lines instead of painting them on but they actually look marvelous and are so easy to do!! I spent an absolute age painting hazard lines on the columns and they didn't even look very good so when I tried these print outs which literally take minutes to cut out and PVA on, my mind was completely changed!

Below you can see the printed hazard lines on the right which took 5 mins max and the hand painted hazard lines on the left which took hours to do all 4 corners!!

The link to the hazard line print out sheet is here:

And here are some stairs I've also added printed hazard stripes to...
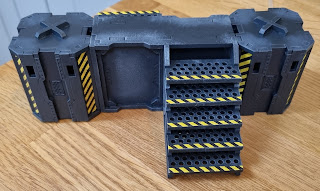

 The effect is great as the stripes really bring out the details on what is quite a dark board...
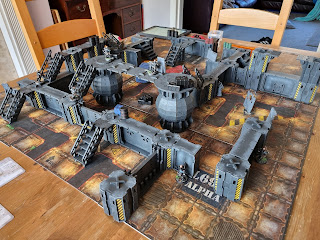

I'm so taken with using print outs I'm in the process of adding some posters too. More on that soon...

James

fourdadsoftheapocalypse.blogspot.co.uk – A blog about Warhammer 40k and the Horus Heresy by four Dads

Wednesday, 10 April 2019

Quick update as the Mantic Terrain Crate scenery grows with more magnets!

Here is a quick video showing how the Mantic Terrain Crate Scenery is growing after I received some more magnets this week.


It is completely modular and can be altered at will. The strength of the magnets is impressive too allowing 2 walkways to join together across a gap which will hold a fair amount of weight.

Tuesday, 26 March 2019

Magnets!!! - Terrain crate Gang Warzone from Mantic - Part 3

As you may know I am in the process of putting together the Gang Warzone Terrain Crate from Mantic Games (bought from Goblin Games) and have been documenting the process so far in part 1 here and part 2. This blog post is all about magnetising this scenery pack to make it truly modular. At the end there is a short video showing how the few pieces I have magnetised fit together and how strong they are - happy reading!
The Gang Warzone Set
Disclaimer - Later on I have included a few videos to show what I have done with the magnets as it's quite hard to explain in text and much easier to show instead - I accept no responsibility for the adverse effects of my voice on anyone's health. Apologies also for having to use Youtube, the file sizes of the videos were too big to upload to the blog.

Recap
My vision was for a cheap, good looking set of industrial terrain to use for both Necromunda and Warhammer 40k. Also I wanted the terrain to be completely modular so that I could arrange it however I wanted individually for each game I play.

If you have been following then you will know that the terrain is well priced and very well detailed for the price. I really like the 'boxy' look although I understand that some people may not like this look. It is fairly easy to paint with car paints from Halfords which also makes it cheap too.
The paints I used
At the current moment the terrain is at a basic level of painting which would look fine for a game - I have sprayed the base colours on (part 2) for a weathered look and have now painted all of the silver parts in Leadbelcher which just needs washing with Nuln Oil.
Metal bits painted - Nuln Oil needed

Friday, 1 March 2019

Painting and weathering - Hairspray & Salt - Terrain crate Gang Warzone from Mantic - Part 2

Following on from the discovery from Goblin Games and unboxing of this kit in part 1 HERE I got right on and started painting. I had no real idea how to paint this terrain other than that I wanted to get it done fairly quickly as I was excited about putting it together and playing with it!

I turned to the dads and asked their advice and Dave came up with the idea of using Halfords car paints for ease of use and cheapness (£6.50 a can). Rich and Steve came up with a colour scheme of mustard yellow - kind of like the colour scheme on the box. I haven't got an airbrush though so Dave suggested to use the hairspray and salt weathering method instead. Now I haven't done this before so thought it would be exciting to give it a go!

Firstly I split the bits up into four parts and blu-tacked them to 4 pizza boxes - 2 x wall panels, 1 x floor panels and accessories and 1 x metal bit so that will just be sprayed black then Leadbelcher.

Laying the terrain out ready for spraying

Tuesday, 26 February 2019

Unboxing and Review - Terrain Crate Gang Warzone from Mantic - Part 1

As you may realise Steve and I (James) have been getting into Necromunda recently and have been playing through the missions on the board in the box set. We are now nearly through them now though and I have been looking around trying to find some terrain that is suitable both price wise and that will cross over and work for Necromunda and Warhammer 40k.

As you may know I have been experimenting with TT Combat's laser cut terrain which I reviewed the large crates HERE and the drum barrels HERE.

I was impressed with both sets and have been considering getting one of their industrial terrain sets. However, I just haven't been able to commit as I just don't like the look of the lasercut terrain.

Therefore I have been looking out and stumbled across Mantic's terrain crate series - in particular the gang warzone and industrial sets.
Mantic's Gang Warzone
I then read some mixed reviews of them but thought that the look, the price (which is very reasonable from Goblin Games!) and the fact that they are modular ticked all my boxes. In the end I got too excited and pulled the trigger on this box set...

My purchase - Mantic's Terrain Crate Gang Warzone